Showing posts with label asian. Show all posts

Saturday, March 17, 2012

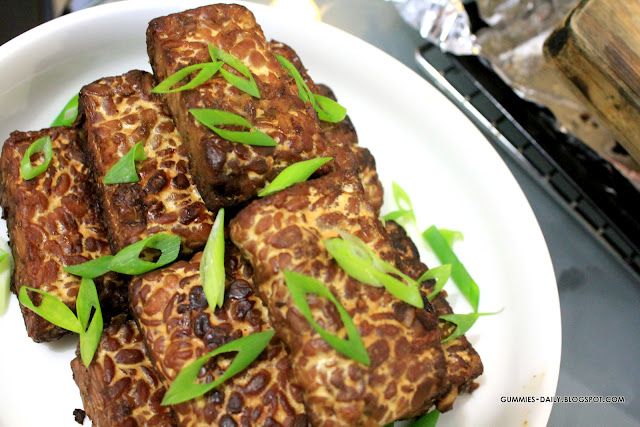
BBQ Tempeh

Fresh from the oven...

Triggers my mind to have'em a bite!!


The fragrance was just oh-so-nice!!
The texture was just oh-so-delicious!!

And the colour was just oh-so-tanned and oh-so-sexy!!

From this moment, i know biting a thickly sliced tempeh was just oh-so-blessed!!


They are just the greatest gift from GOD * Bear with me!! i am getting exaggerating*

But, i couldn't help myself to stop over-describing...

Just because they were simply yummy!!

BBQ Tempeh
Serve 5-6 (a possibilty to be reduced to 3-4 serving, because they are really yum, hehehe...)
Ingredients:
2 blocks Tempeh, thickly sliced (250 gr each block)
Lots of Garlic, peeled ( i used 1 1/2 whole Garlic)
Lots of Shallot, peeled (i used 4 Shallots)
Kecap Manis (Sweet Soy Sauce) - i used 2 tbsp *approx*
Salt and Pepper

Method:
  • Using Mortal and Pestle, coarsely pound the garlic and shallots
  • In a bowl (or ziplock bag), combine pounded garlic, shallots, kecap manis, salt & pepper. Mix well
  • Add in tempeh, toss
  • Marinade for at least 4 hours (best leave overnight) in the fridge - i left mine overnight
  • Next day, line the baking tray with aluminium foil, lightly grease with olive oil
  • Arrange tempeh on the baking tray, oven-bake for 20 minutes *approx* (10 minutes each side) in a 220 degree heated oven
  • Serve warm
Yummehhh...

Thursday, March 15, 2012

Nyonya Food-Babi Pongteh

I have an obsession of watching a Singapore drama, Little Nyonya... i have watched it over and over again...

There were lists of Peranakan food had been mentioned during the drama, which attracts me to find out what are they?

One day, i was browsing on Rasa Malaysia, and discovered a Peranakan recipe which makes me so tempted to cook - Ayam Pongteh ...

Instead of using chicken, i use lean pork in this dish and it turns out allright, causing a less-meat eater like me love it so much : )


It doesn't require a complicated ingredients to cook this Babi Pongteh, i purely adapted the whole process of how Rasa Malaysia did...


However, time is required to perfect this Babi Pongteh... because of using lean pork, it takes double times to simmer the meat until tender... ( i simmered the pork for 2 hours, added water in mid-way to prevent burning, and added potatoes at the last 1 hour)...


Anchovies and Potatoes Sambal


Tempting tempting tempting... it's very yummy even with only rice, i hit like!

Anchovies and Potato Sambal
Serve 5-6
Ingredients:
6 medium Desiree Potatoes, peeled, cubed
200 gr dried Anchovies, rinsed, drained
1 tbsp Tamarind Puree
Corn Starch for coating
Oil for deep-frying
Salt, Sugar, and dash of chicken powder to taste

Paste:
4 Shallots
3 Garlic cloves
1 ripe Tomato
2 heaped tbsp dried Chili Powder (or more if prefer spicy)
a liitle bit Oil

Method:
  • Clean potatoes, peel the skin and cubed
  • Rinse anchovies, and drain (or pat dry with paper towel)
  • Heat enough oil for deep frying (high heat)
  • Meanwhile, pour enough corn starch in a bowl, and start coating potatoes until well-combined, set aside. Repeat with anchovies
  • Oil should be hot enough by the time you finish coating
  • Deep fry potatoes until it turns crispy and golden brown, set aside and drain excess oil
  • Deep fry anchovies until crispy, set aside and drain excess oil
  • Blend the paste ingredients to a smooth texture in a blender, put a little bit oil as it will be easier to blend well *
  • Heat up a non-stick fry pan on a medium low heat, and saute the chili paste until fragrant
  • Add in tamarind and seasoning, taste
  • Finally toss in fried potatoes and anchovies
  • Serve

N.B: *put wet ingredients to blend first before dry ingredients

Happy Cooking!!
xoxo


Wednesday, March 14, 2012

Century Egg and Pork Porridge


I grow up eating porridge, until someday Porridge has become a big No-No for me... As a Teochew, my family loves cooking Plain Porridge to eat with lots of side dishes such as Pickled Vegetables; Salted Duck Egg; Braised Peanut; Fermented Tofu; Preserved Olive Leaves; and etc...

Some time my grandma even only mix the porridge with dark soya sauce...Hmmm, No-No-No-Noooooo...

She's bravo!

But when it comes to a flavoured Hongkong-style Porridge, i would say Yes-Yes!! and my favourite is which most of people will adore as well...  You agree? 

Century Egg and Pork Porridge
Serve 1
Ingredients
1 small bowl of cooked white rice*
1 small bowl of water* (or more, depends on personal preference)
1 Century Egg, boiled
Lean Pork slices ( i use 5 slices per serving, as i do not eat meat very much)
1/2 tsp Chicken Powder
Sesame Oil and Pepper to serve (optional)

N.B: I use the ratio 1:1 for rice and water

Method
  • Boil Century Egg for 5 minutes, or until it cooks, chill in a bowl of cold water
  • Meanwhile, add a bowl of rice together with water into a blender, blend to a finer porridge texture*
  • Transfer blended porridge to a pot, add in lean pork slices, simmer in low heat until it cooks
  • Add in seasoning (chicken powder; sesame oil and pepper), mix well
  • Peel century egg, quartered, or thinly sliced
  • Arrange on the top of the porridge
  • Serve warm

N.B: I use a short-cut to serve porridge, as the original way to cook porridge is using a slower-cooking method, which requires lots of hours :p

Happy Cooking!!
xoxo


Sunday, March 11, 2012

Lazy Weekend - Simple Stir-Fry Cucumber with Egg


There is sometime i feel like not doing anything, because Bruno Mars knows my mind : )

I just went quickly to korean grocery, 99 steps from my house... maybe, i did not count...

Grabbed few pennies, exchanged with some fresh cucumbers...

Went home, i chop chop chopped... garlic and cucumber was ready to cook...

What you need is very simple, it is indeed simple : )

Ingredients:
Serve 4
6 fresh Green Cucumbers
3 cloves Garlic (or more), minced
3 Eggs, lightly beaten
1 tsp Chicken Powder
2 tbsp Olive Oil
Dash of Pepper

Method:
  • Peel the skin of cucumber
  • Thinly sliced the cucumber
  • Minced the garlic
  • Crack eggs in a bowl, lightly beaten
  • Heat up non-stick with 1 tbsp oil, wait until it slighly firmed, gently scramble the egg, and not over cooked them (80% cooked is fine)
  • Add in 1 tbsp oil, saute garlic until slighly fragrant, add in cucumber, and let it sit for 5 minutes, cucumber will release come liquid afterwards
  • Stir occasionally, until cucumber is soft enough, add in scrambled eggs
  • Season with chicken powder and pepper
  • Turn off heat
  • Serve with fluffy white rice

If the laziness still strikes.. shout on anyone in your house, let them do the rest...

Happy Cooking!!
xoxo


Saturday, June 18, 2011

Baked Egg Cake - 鸡蛋糕


Weekend means i need to spend my lovely time in the kitchen : )

Using some simple ingredients that i could find at home, surprisingly, this Egg Cake turns out fragrantly and fluffy...

Baked Egg Cake
Make 1 loaf
Ingredients:
6 Eggs
180 gr Sugar
1/2 tsp Vanilla Essence
180 gr Plain Flour (Sifted)
1/2 tsp Baking Powder
Pinch of Salt
1 drop of Yellow Colouring
Olive Oil to grease the loaf pan


Method:
  • Crack 6 eggs in a mixing bowl, whisk for 5 minute using an electric hand mixer or until it turns pale and fluffy.
  • Add in sugar and vanilla essence, whisk for further 5 minutes using an electric hand mixer.
  • Fold in sifted plain flour and baking powder, add in salt and yellow colouring.
  • Combine well with egg batter.
  • Lightly grease loaf pan with olive oil.
  • Pour in cake batter.
  • Preheat oven to 160 degree, bake for 1 hour.
  • Cooling down the cake before cutting.
Can be served as an afternoon snack or.....
For breakfast tomorrow : )


Happy Baking!!!
xoxo

Friday, June 17, 2011

Eating at Cabramatta - Tan Hung Vuong

Whenever we have a day off, we would snip a chance to EAT at Cabramatta...

It is a Paradise, you can find almost everything there!!

Starting from Traditional Kitchen Accessories, Fresh Fruits and Vegies, Fresh Seafood, Poultry, Butcher Shop, Food, Dessert, Plants, everything and EVERYTHING!! They almost have it all, Fantastic!!

Being born with a nature"Housewife" behaviour, i love there, hehehehe... Simplified "Auntie"??? :p

Always favourite Beef Rice Noodle Soup....

Rice Noodle was cooked to perfection, Chewy Thinly Sliced Beef, Nicely Brewed Clear Soup - not too salty nor bland... Topped with Fresh Basil... Hmm...Just Good!!!

Mr.S is being hooked by this Stir Fried Rice Noodle... He eats it everytime he go!! So I can said it is really yummy....

Picture tells everything : )

All Yummies are at:
No 1 Shopping Centre
11/47 Park Road, Cabramatta

Monday, June 13, 2011

Lunch Box - A Typical Mum's Dish


Lunch Box for Mr. S...

I whipped up something easy - some typical dish that Asian Mum will prepare for us....

Oh, Mum... Again??


I know "Home-sick" after my further step for education.. First, Jakarta. Second, Australia.

Living in a tiny room at Jakarta, i didn't manage to whip myself meal everytime...Oops!!!

In fact, i were well-spoilt at Jakarta!!

"Mbak... Beliin makan dunk!!!" = Totally damaged.... haha....

When you step out of the house, Food is EVERYWHERE!!! Oh-No-Wonder!!! Hello excuses... :p

When you heard someone cracking the "wooden cart-held" with "spatula???".. not sure if they did this with spatula... hehehe..

It's our famous TEK TEK!! you know what i mean if you are Indonesian :p

You can get a packet of fried rice/noodle ready in 10 minutes, just by yelling down from third floor...Exciting!!!

When i came to Sydney, I make meal myself every day : ) I am so in love to be in kitchen...

Sometime i will just missing my mum's home cook... I AM RIGHT NOW!!

Grocery Shopping, SCORE!!

Yummy Food, VOILA!!

Compliment, PROUD!!

Fat, EXPECTED!! *faint*

White Onion & Chives Fried Omelette 
Serve 4
Ingredients:
5 Chicken Eggs
1 White Onion (Finely Chopped)
Bunch of Chives (Finely Chopped)
1/2 tsp Salt
1/2 tsp Chicken Powder
Dash of Fish Sauce
Dash of White Pepper
Dash of Black Pepper
Olive Oil for frying


Method:

  • Rub salt on finely chopped white onion, it will soften the onion in 10 minutes.
  • Heat up frying pan with oil, sauté white onion and chives until slightly brow, move to clean plate.
  • In a bowl, crack in eggs, lightly beaten with chopsticks.
  • Add in chicken powder, fish sauce, white pepper, black pepper, white onion and chives, mix well.
  • Pour the egg batter into frying pan on a small heat. (I divided the egg batter into 2 portion, fry twice)
  • Pan fry each side for 3 minutes.
  • Serve.
You must be thinking... Ew.. Bitter Gourd... Mr S and I both love this vegie : ) 

This can be a wonderful dish, if you are trying to combine sweet and sour in it... Madness!!!

Stir-Fry Bitter Gourd with Beef in Fermented Soy Bean and Tamarind Sauce
Serve 4
Ingredients:
2 Bitter Gourd (Deseeded and Thinly Chopped)
100 gr Sliced Beef
4 cloves Garlic (Coarsely Chopped)
1 tsp Salt (For Marinade)
1 tsp Chicken Powder
2 tbsp Fermented Soy Bean 
2 tbsp Tamarind Sauce
4 tbsp Sugar
Few Drops of Dark Soya Sauce
Dash of Fish Sauce
Olive Oil for Stir Fry


Method:

  • Rub salt on thinly chopped bitter gourd, leave for 30 minutes. This will soften the bitter gourd.
  • After 30 minutes, drain the excess water remained on the bitter gourd.
  • Heat up wok with oil, sauté garlic until slightly brown.
  • Add in bitter gourd, stir fry for 3 minutes.
  • Sprinkle few dash of fish sauce on the entire side of wok. This will cause a tingly burnt that smell fantastic.
  • Add in fermented soy bean and tamarind sauce.
  • Splash few drops of dark soy bean sauce on the bitter gourd.
  • Add in seasoning - chicken powder and sugar.
  • Stir fry until seasoning are dissolved.
  • Arrange on a clean plate.
  • Serve.
Has topped the Omelette with Sambal Ebi, perfection!!! - will post out the recipe someday : )

Happy Cooking!!!
xoxo

Saturday, June 11, 2011

Baked Cheesy Pineapple Fried Rice

Nothing special!! just a plate of fried rice ....

Trying to make something different, i put grated cheese on the top of the fried rice.. YES!! CHEESE!!


Holy Cheeseeeeeeeeeee ..............!!!!

I command oven to make-over my fried rice into ........


Oh-so-sexy yet sinful Cheesy Pineapple Fried Rice : )

Serve 1
Ingredients
1 portion of rice (1 day old preferred)
1/4 White Onion
1/4 Green Capsicum
2 slice Canned Pineapple Ring
2 Shitake
1 Lap Cheong (Chinese Sausage)
1 Egg
Grated Cheese ( I use Cheddar, but Parmesan preferred)
Oil for cooking (I use Olive Oil)
1 tsp Chicken Powder
1/2 tsp Turmeric Powder
1/2 tsp Curry Powder
Dash of Fish Sauce
Dash of White Pepper
Dash of Black Pepper


Method:

  • Chop white onion, green capsicum into desired size.
  • Slice canned pineapple ring into bite size.
  • Soak shitake in hot water for 5 minutes, and chop into bite size.
  • Slice lap cheong into bite size.
  • Heat up wok with oil on medium heat.
  • Put in white onion; shitake and green capsicum, stir fry until soften.
  • Add in lap cheong; pineapple; rice, combine with white onion and green capsicum.
  • Sprinkle a dash of fish sauce.
  • Crack one egg, stir well with fried rice.
  • Add in chicken powder; turmeric powder; curry powder; white pepper and black pepper.
  • Stir well, until rice turn into yellow colour.
  • Arrange nicely in oven-safe dish.
  • Finally sprinkle with grated cheese.
  • Preheat oven to 150 degrees, oven-baked for 15-20 minutes.
  • Serve warm

Happy Cooking!! 
xoxo


Sunday, May 29, 2011

Boiled Bok Choy with Oyster Sauce

Serve : 4
Ingredients:
3 bunch Bok Choy
3 tbsp Oyster Sauce
1 1/2 litre water for boiling
1 tsp Oil (I use Olive Oil)
1 tsp of Salt

Method :
  • Cleanse and drain the bok choy.
  • Prepare 1 1/2 water, bring to boil.
  • Add in oil and salt.
  • When the water is boiling, add in bok choy, boil for 5-10 minutes.
  • Drain the excess boiling water.
  • Arrange bok choy in a plate.
  • Add in oyster sauce.
  • Serve warm.
YES,that's easy !!!! : )

Happy Cooking!!
xoxo

Sunday, May 15, 2011

Salted Duck Eggs Fried Rice

Mr.S loves fried rice. Rather than using chicken egg i switched to salted duck egg to toss in this fried rice, which is turned out presentable on the dining table as well as tasty. 

Serve: 1 
Ingredients:
1 tbsp Olive Oil for frying
2 clove garlic
1/4 small White Onion
1 small bowl of White Rice (1 day old preferred)
1 Salted Duck Egg
1 Sweet Corn
2 small Red Chillies 
1 Stalk Spring Onion
1 tsp Chicken Powder
Dash of white pepper
Dash of Black Pepper
30 gr of Torn-chicken


Method: 
- Finely chop the garlic; white onion; and spring onion. Set aside.
- Separate the salted duck egg yolk with the white in different bowl. Mash the yolk with fork. 
- Separate the sweet corn seeds with a knife. Set aside.
- Deseed the red chillies and chop finely. Set aside.
- Heat up wok with 1 tbsp of olive oil.
- Saute garlic and white onion until fragrant/soften.
- Add in white rice, toss well with the garlic and white onion.
- Pour in salted duck egg white, stir well with the rice. Keep stirring to prevent burnt.
- Add in corn; red chillies; spring onion; and mashed salted duck egg yolk. Tossing on a small heat for 5 minutes. 
- Flavoured with chicken powder; white pepper and black pepper. Keep tossing to combine well. 
- Garnish with torn-chicken. I was using some left over from the Chicken Soup i have cooked last night.
- Turn off the heat. Serve warm.


Happy Cooking!!
xoxo

Friday, May 6, 2011

Sweet Sour Chicken Strip

Creating a brand-new theme for my blog has given me a strong will to write up new post as often as possible, hehehe... any comment? does it look better and fresh?

Today's blog will be covered by the tempting topic of Sweet Sour Chicken Strip. For a healthier option, i pan-fried the chicken strip rather than chunks every pieces of chicken into a deep frying oil. Well for me, i will feel guilty whenever i have munched on fried food, oh...fatness, cholesterol!! Too exaggerating? Haha... I am that kind of person. Sometimes i will go for oily food, but, once in a while! 

All you need is patience to cook this dish, small heat is required in this cooking process, we don't want a medium-rare chicken - 3 minutes on each side. Somemore, be ready to not clean your kitchen floor before cooking this dish, ticks for oily floor :p


Serve: 4
Ingredients: 
400 g Chicken Breast 
Sesame Seeds for garnish
Oil for pan-fry

Batter:
2 Eggs
150 gr Corn Flour
2 tsp  Chicken Powder
Dash of Black Pepper
Bread Crumbs as needed

Gravy:
3 cloves Garlic
3 tbsp Tomato Sauce
1 tbsp  Chili Sauce
3 tbsp Sugar
50 ml Water
1 tsp Corn Starch diluted in 2 tbsp Water


Method:
-Cleanse the chicken, and cut into strips, set aside.
-Mince the garlic with knife, set aside.
-For batter, crack two eggs in a mixing bowl, Beats. Pour in corn flour, and finally season with chicken powder and black pepper, combine well.
-Prepare bread crumbs in a clean plate, set aside.
-On the other side, heat up a non-stick frying pan, prepare for pan-frying those chicken strips.
-Chunk chicken strips in the batter, take out, fold with bread crumbs and gently arrange it on a non-stick frying pan.
-Remember small heat is required, and pan-fry those chicken strips for 3 minutes on each sides, Set aside.
-Line a paper towel in a clean plate to let the oil traces left on chicken be absorbed.
-For gravy, stir fry the garlic until golden brown, add in tomato sauce; chilli sauce and water, let it boil for a while.
-Add in diluted corn starch, turn off the heat if it has turned sticky.
-Add in Sugar, stir well, and finally toss the Chicken Strip in the gravy.
-Garnish with Sesame Seeds, serve warm. 

Happy Cooking,
xoxo


Thursday, May 5, 2011

Steamed Chinese Egg Cake

It has been a while i do not make a blog post after my arrival in Sydney since 30th of March. Mum, Dad, Sister came to Sydney for holiday. I can't remember how much Fun Time we have spent together, countless!!

Counting from that day, it has been 1 month i didn't fill up my blog. 

Firstly, i was busy spending quality time with fams : ) Breakfast; Lunch; Dinner, all together, Nevertheless, Unlimited chit-chat; Snapping photoes with my new camera (Mr.S gave me surprise when i first stepped in my house in Sydney, the lovely camera was arranged beautifully on my desk, SURPRISE!!!)  

Second, I have been graduated on 8th Of April at NIDA theatre with my lovely friends! Since that day, i have been countlessly searching and applying office job online, desperately hoping for a call, but zero in result : ( 
at least, i have tried my best!! (i haven't give up and still continue to search for treasure) P.S: if it continues, i will do whatever job to fill up my "spare" time and bank account :p

Kitchen Adventure continues though, i have found a new blog on site today. The Steamed Egg Cake at Cooking Crave caught my attention. I know it is yummy and very easy to make,so why not?

simple ingredients required in this process, all adapted from Cooking Crave

Ingredients:
5 Eggs
200 g Sugar

100ml Vegetable Oil
130ml Milk

280 g CakeFlour
4 tbsp Custard Powder (I skipped)
2 tsp Baking Powder
1/2 tsp Baking Soda
1/4 tsp Salt


Method:
Using an electric mixer, generously beat the egg and sugar until very fluffy, and the colour turns pale.
Sieve the flour; baking powder and baking soda, fold it in the egg mixture, combine well.

Add in salt; vegetable oil and milk, combine well.

Line a baking paper on a pan.

Pour the batter in.

Steam on high heat for 30 minutes.

Check with skewer, if it comes out nicely without any cake traces, then you're done.


Happy Cooking!
xoxo

Monday, January 3, 2011

Teddies in the Soup

How cute the pasta is??
They are teddies pasta!! 

This pasta caught my eyes when i did my grocery shopping yesterday, they were on sale for only $0.99/packet
Could I resisted not to buy? : )

Me: Mr.S, you will be having a cute breakfast later!!
Mr. S: (brushing teeth) Cute? it must be awful!!
Me: (stare at him with my ultimate "full-of-hatred" eyes & walk away)

I always tried out any kind of new dishes, and he doesn't like it sometimes
Whenever, i cooked a new dishes, he will never admit it's actually taste good until he try it
He's the top food picker at home....


Lucky, I am a "whatever" person.. I keep trying out new dishes without being distracted by his annoying comment : ) 


My first attempt to make my very own "Prawn Ball"
Not too bad, just lack of saltiness in it 

Make 12 Balls
200 gr Prawn (after de-shelled and vein removal)
3 tbsp Tapioca Starch
1/2 tsp Salt (will increase the amount of salt next time)
1/2 tsp Sugar
1 Egg
Dash of Pepper

Method:
Finely chop the prawn into minces
Add in all ingredients and mix
Shape the Ball and drop into boiling water until it well-formed
Turn off the Heat
Soak in Cold Water, Set Aside

I will never throw away those Prawn Heads as I will use them to prepare the soup 
Flavour enhancer, such as: MSG; Chicken Powder, etc will be used less or even with only a pinch of salt can bring the sweetness of the soup

Soup Base
Prawns Head
100 gr Anchovies 
Water as needed
Salt and Pepper to taste
Few drops of Sesame Oil

P.S: i used slow cooker for the soup and left it on a low heat setting until the next morning

Boil the Pasta with salt added in the water until soft, soak in cold water, drained and set aside
Heat up the Soup and add in Prawn Ball and some vegetables
Arrange Pasta, Prawn Ball and Vegetables in a clean Bowl
Pour in Soup
Serve


Happy Cooking
xoxo


Thursday, December 30, 2010

Seaweed Salad

Why Salad? 
I have been eating raw foods and other healthy stuff for this past 2 weeks
Gladly the extra 6 kg that i have put on, have been shed off by 3 kg... and it stops!! why? tell me why?

My wedding is coming, 30th of January exactly..
Being selfish to my taste buds, i consume nearly plain food every day.. apple, orange, carrot, boiled vegies (no salt if acceptable); i have given up my favourite chocolate; no sweets some more; drinking almost 3 litres of water everyday and made me visit toilet countless times...
Because i just want to be fitted prettily into my wedding gown... 

  Honestly, i am still not so sincerely to allow this 3 kg of fat hanging around my body...oh well, i have tried my best at least!! it just want to stop, what can i do? haha.. : )

This light and tasty seaweed salad will be my dinner tonight


Serve: 1
Ingredients:
A handful of dried Seaweed 
3 dried Shitake
1 Carrot
1/2 block of Tofu
1 Tbsp Brown Rice Vinegar
1 tsp Sesame Oil
1 tsp Roasted Sesame Seeds
Pinch of Salt and Sugar*

*You can adjust the amount of Salt and Sugar as you prefer

Method:
Soak Seaweed and Shitake with hot water until soft and tender
On the other hand, prepare carrot; tofu to cut into bite sizes
Cut Shitake into bite sizes if it has soften
Arrange each ingredients in a bowl
Put in Brown Rice Vinegar; Sesame Oil; Salt and Sugar
Garnish with Sesame Seeds
Store in the fridge for 30 minutes*

*Chilled Salad is tastier

Happing Cooking

xoxo


Saturday, November 6, 2010

Kaya Steamed Bun

I have made Kaya Steamed Bun on last Tuesday
I was so surprised that the dough was much fluffier and softer compare with my previous attempt
I adapted this dough recipe from My Little Space

I can't shape bun very well actually, all i can is only make round Bun, hahaha...


I need to improve my Bun-shaping skill!


Ingredients:

Dough A 
150 ml Water
185 gr Cake flour
1/2 tsp Baking Powder
1/4 tsp Yeast

Mix and let it proof over night (cover with a lid)

Dough B
375 gr Pao Flour
25 gr Oil
100 gr Water
180 gr Sugar

In a seperate bowl mix in
2 tbsp Baking Powder
3 tbsp Water

Filling:

Method:
Mix Dough A, let it proof over night
Mix Dough B followed by Dough A, knead until smooth
Mix in 2 tbsp Baking Powder and 3 tbsp Water in a separate bowl, gently fold into the Bun Dough, knead
Divide the Flour into a small pieces, add filling and shape
Rest the Bun for 45 minutes before steaming
Finally steam in a high heat for 30 minutes


Happy Cooking!!!
xoxo


Wednesday, November 3, 2010

Sunny Side Up Egg and Luncheon Meat Noodle Soup

I will always store some canned food at home as a preparation for my lunch or dinner when i am busy to go out for grocery shopping.I have been eating luncheon meat since i was young. However, i will not use any canned / instant food when i am able to go out for fresh foods : ) I treated them as an emergency food. 

This is another easy, comfort and hearty meal to be enjoyed as your lunch or dinner. 
It is simple to be prepared and not much ingredient is needed to make this meal. 
As I am busying with my uni report yesterday, I didn't step out from home the whole day. I am glad it's almost done, hopefully will be submitted by today : )

Isn't it exciting to poke the half cooked egg yolk? :p

Ingredients: 
150 gr Noodle
1 Egg
2 slices of Luncheon Meat
Green Onion (finely chopped)

Method:
Boil the Noodle in a pot, 2 minutes at highest heat
Drain the noodle - rinse with cold water followed by hot water if you want a QQ noodle
In another wok, heat up a little bit of Oil
Pan fried the Luncheon Meat, 3 minutes each side at medium heat
Set aside
Fry Egg in the same wok at medium heat - don't flip the Egg over if you want to feel the excitement of poking an Egg Yolk!! 

For the soup, you can use any Chicken Broth that are sold at grocery store, heat them up
Arrange the Noodle, Egg, and Luncheon Meat in a bowl
Pour the soup over; garnish with Green Onion
 Serve

Easy and Yummy dinner is done in no time!! 
Happy Cooking!!!
xoxo


Tuesday, November 2, 2010

Home-made Kaya

Kaya is almost a wonder spread that goes well with variety of foods, such as: Plain bread; Toast; Steamed Mantou; or Lebanese Pita Bread. 
The creamy texture of Kaya is made from common ingredients that can be found easily anywhere. Kaya is a jam made from Coconut Milk, Eggs; sweetened with Sugar and enhanced with a natural aroma flavoured by Pandan Leaf.

Kaya is best served with toast accompany with a cup of Hot Long Black Coffee (Kopi-O) / Hot Milo. The best time to serve Kaya Toast is during breakfast and tea break (around 3 pm). It reminds me about my life in Tanjung Pinang, i used to order Kaya Toast as our tea-time snack (Dad's and mine) from a Coffee Shop located just a few block apart from his office. Sometimes Mum will bought some Home-made Kaya from store and i'll have them as my breakfast too. 

A ready-to-served Kaya can be found easily at any Asian grocery nowadays. But nothing is better than a fresh home-made food, including this lovely Kaya Jam.


I believe most of you know that there are two types of Kaya available in the market - Greenish and Brownish 
In my personal opinion, there is not much different (taste) between those two after i tried, it's just mainly the differences of its colour. How'd you think?

This is my first time of Kaya-making. I found that the natural colour from the Kaya itself was not really attractive, so i decided to add a little bit of Green colouring, and it turned out beautifully. I will do some research to find the way to produce Brownish Kaya. 

Kaya-making process is easy, i adapted this recipe from Simply June
Beside those simple ingredients are needed to make Kaya, Patient is the most crucial element that must be included to produce a nice Kaya. A taste of a food reflects the feeling of who are cooking the food. If you were cooking with sadness, then the person who ate your dish will feel the same as how you felt. (this quote was from Little Nyonya Tv Drama) :p I have watched too much!!

Ingredients:
6 Eggs 
450 gr Sugar*
475 ml Coconut Milk*
4 Pandan Leaves (Knotted)
Green Colouring (Optional)

Method:
Hand-whisk the sugar and eggs, until the sugar dissolved
Add in Coconut Milk
Pour into another clean pot through a sieve
Boiled the Kaya within a teflon filled with water (as seen in picture) at medium heat


It takes about 45 minutes to thicken the Kaya
Stir them occasionally 
Cool it before you store the Kaya

N.B:
* i will try to reduce the amount of Sugar (350 gr) and Coconut Milk (375 ml) next time, it was too sweet for my personal liking; and a bit watery.
45 minutes might be sounds frightening. You don't need to worry about the Kaya will burnt, just check the water in the teflon occasionally. I added about twice water during the cooking process. 
You can do other things while waiting for the Kaya to surprise you : )
I managed to vacuum my entire house!!

And i store my Kaya in the fridge : )

Kaya Toast


Happy Cooking!!!
xoxo


Spicy Butter Prawn


My Sambal Belacan did surprise me a lot. Beside using it as a dip, i have cooked Kangkung Belacan last week and i just use it as an ingredients to cook this Spicy Butter Prawn. It is a last minute idea that day, due to my laziness to go out and do my grocery shopping, i need to squeeze my brain thinking of what to cook as dinner for hubby, noted - he's a food picker!! and easily get bored if i cook similar dishes everyday. 

Luckliy, hubby bought a kg of Prawns few days ago and froze them up. On the other hand, i was still searching for other nice ingredients to cook along with this dish. I found Butter; Green onion; Garlic (i never ran out of it) at home. I seldom use Butter to cook as it's too fattening. But in order to create more variety of dishes to feed hubby's stomach, i use it and it smelt so fragrant. Every food with Butter will just taste so great and tempting. 

Ingredients:
1 kg Prawns (de-shelled) 
5 cloves Garlic (finely-chopped)
1 tbsp Butter
1/2 tbsp Sugar
2 stalks Green onion (finely-chopped)

Method:
Melt Butter in a wok
Saute Garlic until golden brown
Add in Prawns, stir fry for around 3 minutes
Stir fry for another 3 minutes
Add in Sugar
Garnish with Green Onion
Serve warm