Showing posts with label Vegetarian. Show all posts

Sunday, March 18, 2012

Bean Balls with Garlic Sauce - Vegetarian


Aren't they beautiful?

Despite the good taste, they are however lack of a tiny bits of moisture...

And easily falling apart...

Maybe i should have joined Egg? or maybe Tofu to make it firmer? Idea?
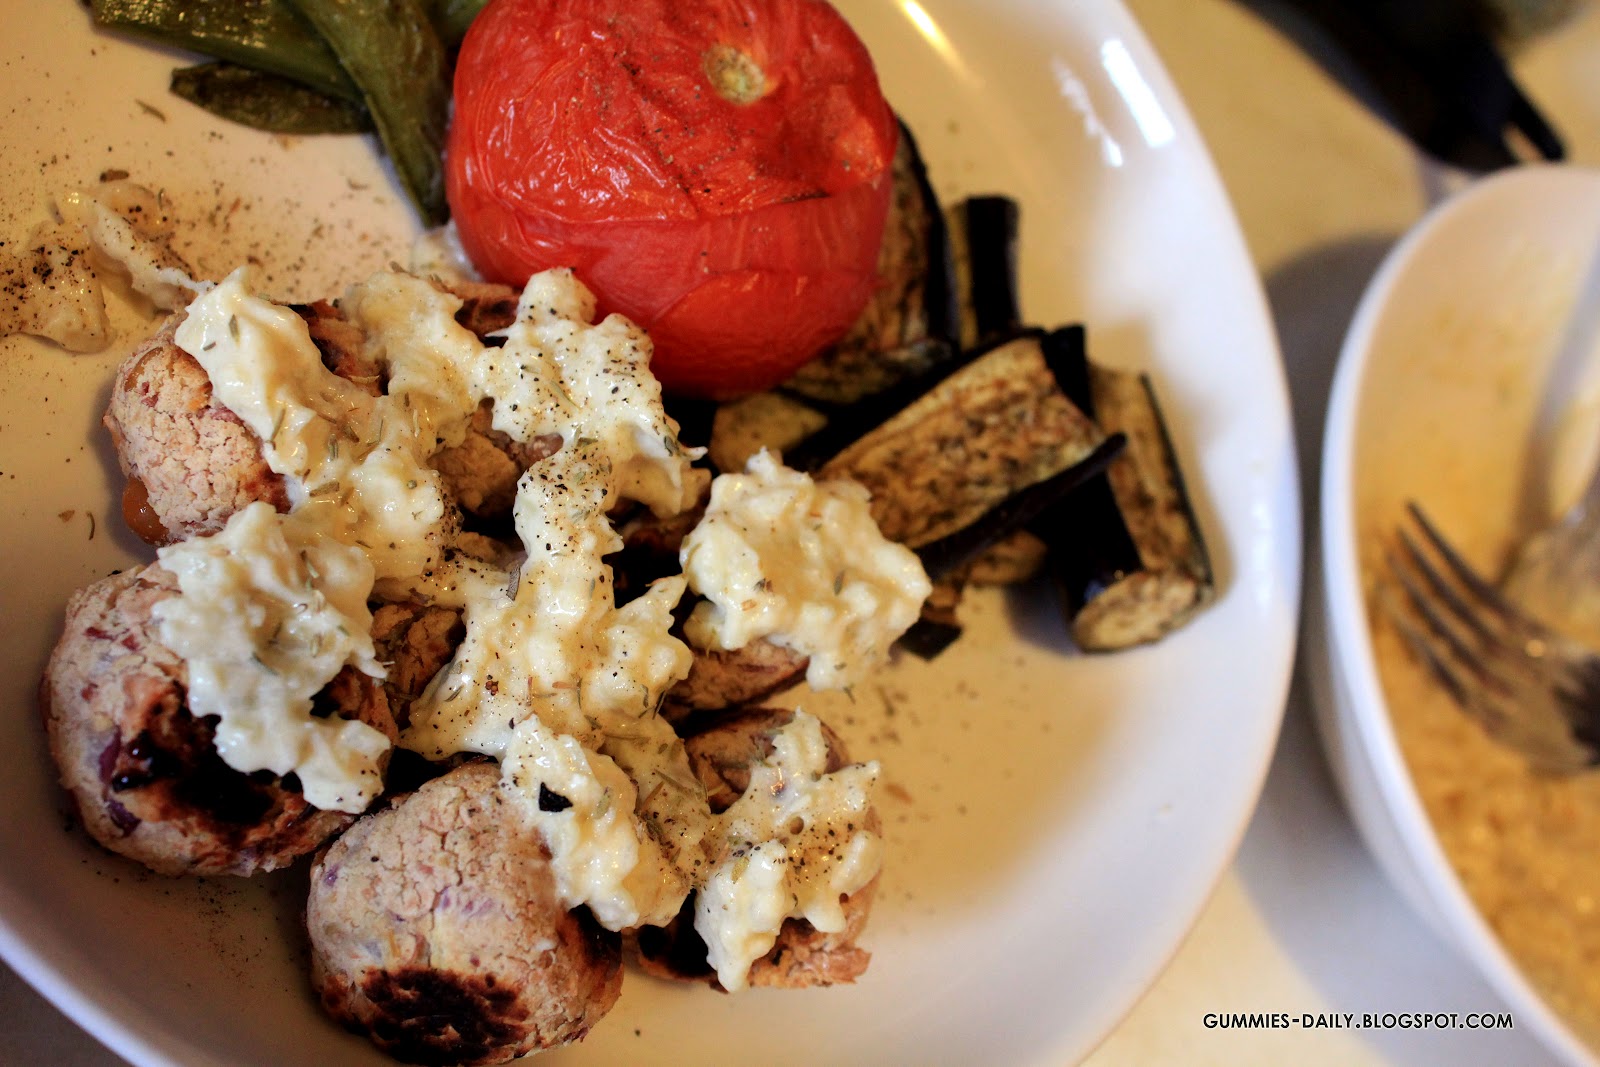
The nonsense sauce was a steal though! being too "creative" a.k.a "short of ingredients at home" (sounds well at the beginning, failed at the end, lol) , i mix matched everything i can grab from the pantry... : )

At the first glance i saw garlic!! Aha... I ever ate something-something with garlic sauce... ticked!

I wanted something sour, so yogurt works!! ticked!!

Look at the white boring colour and tasteless still sauce, i mixed dried thyme leaves (just a bit, i wanted only colour), salt & pepper, lemon juice and a dash of mustard powder (too much no good)..

And the final touch was truly fab... few drops of SESAME OIL!! i just love how sesame oil enhance the taste of this garlic sauce!!

To make it healthier, i paired the bean balls with roasted snow peas; eggplant and tomato (they were all lightly oiled; salted; pepper-ed and roasted).. the taste was just as lovely as its colour!!

Bean Balls with Garlic Sauce

Bean Balls
Makes 15 balls
Ingredients:
400 gr Mixed Bean - no added salt, mashed ( i used Edgell)
1 tsp Vegetable Powder (or adjust to taste)
3 heaped tbsp Gluten-Free Bread Crumbs *approx*
1/2 medium Red Onion, cubed
1 tsp Olive Oil
Extra Olive Oil to pan-fry

Method:
  • Drained the beans and mash with fork until completely smooth, set aside
  • Peel the onion, and tinily cubed
  • Add in vegetable powder, bread crumbs, olive oil, and cubed onion in a bowl of mashed beans, Combine well
  • Shape the bean mixture to ball
  • Lightly grease olive oil in a heated non-stick frying pan, pan fried the bean balls at very low heat for roughly 10 minutes, flip each sides in mid-way (they get burned very easily)*


N.B: The bean balls could be very hard to handle, be careful while handling.. let me know if you have a good suggestion... 

Garlic Sauce
Make 2 serves
Ingredients:
2 whole Garlic, skin on, roasted
2 tbsp Natural Yogurt
1 tbsp Lemon Juice
1 tsp Sesame Oil
Dash of Mustard Powder (not too much)
Dried Thyme Leaves
Salt and Pepper to taste

Method:
  • Cut off the root end of garlic, wrapped with aluminium foil and roast for 15 minutes (or until soft) at 220 degree heated oven
  • Meanwhile, in a small bowl mix yogurt; lemon juice; sesame oil; mustard powder; dried thyme leaves, set aside
  • Take the roasted garlic out of oven, simply squeeze the garlic out of its skin, mashed, combine with the yogurt mixture
  • Salt and pepper to taste

Oh... and don't forget to treat yourself with a breath freshener sweets after meal! hahaha... you still love garlic? i love!!!


Happy Cooking!!
xoxo

Saturday, March 17, 2012

BBQ Tempeh

Fresh from the oven...

Triggers my mind to have'em a bite!!


The fragrance was just oh-so-nice!!
The texture was just oh-so-delicious!!

And the colour was just oh-so-tanned and oh-so-sexy!!

From this moment, i know biting a thickly sliced tempeh was just oh-so-blessed!!


They are just the greatest gift from GOD * Bear with me!! i am getting exaggerating*

But, i couldn't help myself to stop over-describing...

Just because they were simply yummy!!

BBQ Tempeh
Serve 5-6 (a possibilty to be reduced to 3-4 serving, because they are really yum, hehehe...)
Ingredients:
2 blocks Tempeh, thickly sliced (250 gr each block)
Lots of Garlic, peeled ( i used 1 1/2 whole Garlic)
Lots of Shallot, peeled (i used 4 Shallots)
Kecap Manis (Sweet Soy Sauce) - i used 2 tbsp *approx*
Salt and Pepper

Method:
  • Using Mortal and Pestle, coarsely pound the garlic and shallots
  • In a bowl (or ziplock bag), combine pounded garlic, shallots, kecap manis, salt & pepper. Mix well
  • Add in tempeh, toss
  • Marinade for at least 4 hours (best leave overnight) in the fridge - i left mine overnight
  • Next day, line the baking tray with aluminium foil, lightly grease with olive oil
  • Arrange tempeh on the baking tray, oven-bake for 20 minutes *approx* (10 minutes each side) in a 220 degree heated oven
  • Serve warm
Yummehhh...

Green Monster Smoothie


This greenie is the bomb! they look beautiful in green and taste very refreshing...

Finally i have taken courage to try this green monster!

I thought it will be very awful? Spinach + Milk + Banana + some other fruits ?? How can spinach taste good in a smoothie? Eww....

Wrong, wrong Baby... You're wrong!!

After reading a very good review of this Monster everywhere, and also from Skinny Taste (there are lots of low fat recipes there, peeps!!!), i give it a try!!

I think i get hooked : )

Green Monster Smoothie
Serve : 1
Ingredients:
100 gr Baby Spinach
200 ml Unsweetened Soya Milk
1 ripe frozen Banana ( i simply peel a banana, cling-wrapped it, and freezed) - they function as an ice cube!
1 tsp sweetener *optional*

Method :
  • As easy as 1,2,3! Put everything in a blender, blend to puree... transfer to a tall glass, Slurrpp!

This Monster are good for detoxing : )

Happy Monster!!
xoxo


Tuesday, March 13, 2012

Carrot, Corn and Konnyaku Salad

Have you ever munched on a chewy jelly-like texture konnyaku?

Konnyaku usually serves in Japanese or sometimes Korean food as side or ingredients that will be added in their dishes...

Konnyaku is made from a plant - Konnyaku Potato. It is a marvellous health food among Japanese - contains 97% of water and 3% of dietary fiber which made them nominated as a wonder natural food for most Japanese...

Konnyaku can be easily found in most asian grocery in Sydney. You will see different types of konnyaku sell in the market - blocked (available in 250 gr and 500 gr); noodle types (popular named "Shirataki" or "Miracle Noodle"); white or blackish colour...


Konnyaku is popular among active dieters, becauce they are rich in minerals and provide almost no calories for consumer (note that there is still few calories contains in a block of 250 gr Konnyaku). It will expand after consuming, and keep them feeling full without indulging the extra un-wanted calories...

There are a lot of health benefits have been found in this wonderful health food - it can normalises the level of choloesterol; prevents high blood pressure and normalises the level of sugar in the blood... WOW!!

Some people might not be able to accept this tasteless Konnyaku. However there are lots of way to consume this wonderful health food. Surprisingly, Konnyaku absorb flavour easily in any kind of dishes. So, why don't include konnyaku as a part of your healthy diet : )

I decided to make Konnyaku as a refreshing side-dish...

Carrot, Corn and Konnyaku Salad
Serve 4 (as sides)
Ingredients
250 gr blocked Konnyaku
200 gr Sweet corn Kernels, juice removed (canned)
1 small Carrot, diced
1 tbsp Sesame Oil
2 tbsp Light Soy Sauce
Dash of Pepper
Corriander for garnish (optional)

Method:
  • Gently remove konnyaku from its packaging, drained
  • Slice konnyaku (approx 1 cm thick)
  • Cut a length in between konnyaku slices (be careful not to seperate them, we just want to create a space for twisting)
  • Gently twist konnyaku by grabbing one of the end of konnyaku and go through the "space" that we have created - i adapted from here
  • Toss konnyaku with sesame oil, light soy sauce and pepper, set aside for 15 minutes (or you can leave them over night in a air tight container)
  • Meanwhile diced carrot and bring to boil until soft enough
  • Drain corn kernel from its packaging
  • Toss together - carrot and corn with konnyaku
  • Garnish with corriander
  • Serve Cold

Sources : 1, 2, 3

Happy cooking!!
xoxo

Monday, March 12, 2012

Butternut Pumpkin Soup

Dear Pumpkin,

I love you so much!!

Sincerely,
Soup-ie

You love pumpkin soup?

I love'em!!

I wanted something comforting yesterday, and w/o doubting too much i made pumpkin soup for myself... and will make them more often start from today! it was a really satisfying light dinner which has brought me to a wonderful lala land and i danced with a pumpkin head, NIGHTMARE!! (*just kid)...hehe..

I Love You, Pumpkin!!


I love chunky soup with vegie bits, so I....


left some sauteed brown onion to be added in the soup, as well as some mushroom and zucchini...

I topped the soup with few of coriander leaves just because i think orange and green would be so matching... haaaa!

Butternut Pumpkin Soup
Serve 2-3 (depends on how much you love pumpkin soup)
Ingredients:
Half of medium Butternut Pumpkin (approx 1 kg on a halved pumpkin)
1 Brown Onion, diced
2 Garlic cloves, minced
2 cubes Vegetable Stock
1 tbsp Olive Oil
Dash of Pepper
Dash of Nutmeg
Water for boiling (you can adjust the water depends on how creamy you want your Pumpkin Soup to be)*
Mushroom slices (optional)
Zucchini slices (optional)
Coriander leaves for garnish (totally optional)

* i used roughly 750 ml water to simmer my pumpkin

Method:
  • Peel off the pumpkin skin, cubed
  • Bring water to boil
  • Add in pumpkin in a hot boiling water, simmer until pumpkin has turned soft enough
  • Set aside and cool down
  • Dice brown onion and mince garlic
  • Heat up oil in a pan, saute brown onion, garlic until soft, set aside (left some sauteed onion, if you like chunky soup)
  • Transfer the chilled pumpkin cubes together with the sauteed onion and garlic to a food processor, adjust the water depends on your personal liking, blend to puree
  • Transfer the pumpkin puree to a pot, boil on a medium low heat, add seasoning (vegetable cubes, pepper and nutmeg) to taste
  • On the other hand, prepare the zucchini slices by boiling them (optional)
  • Saute mushroom with the left sauteed brown onion until soft (optional)
  • Add in cooked mushroom, zucchini slices to the pumpkin soup, mix (optional)
  • Garnish with coriander leaves (optional)
  • Serve warm

P.S : I am blogging at my working place * runnnnn.....*

Happy cooking!!
xoxo


Wednesday, March 7, 2012

Avocado and Yoghurt Dip

This is L.O.V.E !! these combination are MAD LOVE!! I like avocado, i like yoghurt, i like the sour taste of lemon, i like the sharp taste from onion - to conclude, i LOVE everything in this dip!!

Avocado and Yogurt Dip
Make 2 Cup *approx*
Ingredients:
1 ripe Hass Avocado, peeled, mashed
1 tbsp Low-fat Natural Yoghurt (or Greek Yoghurt)
2 tbsp Lemon Juice
1/2 Red Onion, coarsely chopped
a stalk of Mint, finely chopped
Dash of dried Thyme
Salt and Pepper to taste


Just mix every ingredients in a bowl.... Alternatively, it can be blended with a blender or food processor to achieve a more creamy and finer paste....

I am just too lazy to wash everything later.... *Sinned*


Pair with fresh chopped vegetables, or toasted pita chips or anythingggg and anythingggggg that you think is delish....

Spot that roasted sweet potato wedges, they are so de-li-ci-o-us!!!

Cut any kind of potatoes you fancy into wedges or stick, generously well-mixed with olive oil, salt and pepper.... yes, that easy!

Heat up oven, go to shower, put on moisturiser, back after 45 minutes and dream will come trueeee !!!!!

And oh!! don't forget to cover the potato wedges with aluminium foil at the first 15 minutes, otherwise all gone black.. hehehe... *i don't take the responsibility for your burnt sweet potatoes* :p

Happy Cooking!!!
xoxo

Tuesday, March 6, 2012

"Meatless" Zucchini Pasta Bolognese

While i was doing my morning routines - reading any updated blog post from my favourite blogger, the "Zucchini Lasagna with Bistik Flavors" from Mochachocolata Rita attracted me so so so much!!

I am one of the healthy-junkies in this earth :p 

Inspiration come to mama... Ding!! Zucchini Pasta Bolognese!! 

Thinking of meat? hmm.. I am not really a big meat eater... 


 I decided to use tempeh as the substitution of minced meat, Deal!!! 

"Meatless" Zucchini Pasta Bolognese
Serve 2
Ingredients:
3 Zucchini
1/2 Red Onion (or White Onion)
400 gr of tinned Whole Peeled Tomatoes
1 tbsp Extra Virgin Olive Oil
1/2 block of Tempeh (from a packet of 250 gr)
Enough water to boil Zucchini Pasta
Grated Parmesan Cheese for garnish

Seasoning:
1 tsp Vegetable Stock 
1 tbsp Raw Sugar ( or adjust according to personal taste) - i like mine sweeter 
Dash of Black Pepper 
Dash of Nutmeg Powder *optional*

Method:
1. Zucchini Pasta
  • Peel off the skin of Zucchini using a peeler
  • Thinly slice Zucchini (i sliced as could as possible to imitate the form of fettuccine)
  • Heat up pot of water, wait until it is boiled thoroughly, add in Zucchini
  • Boil for 1 minute only*
  • Drain excess water, set aside
*Avoid boiling too long as it will soften the Zucchini and causing it lacks of texture

2. Bolognese Sauce
  • Mashed Tempeh with cleaned bare hand ( you can use a fork for hygiene issue)*
  • Heat up non-stick frying pan with oil
  • Saute Onion until slightly fragrant
  • Pour in tinned Tomatoes, simmer in medium low heat for 3 minutes (or until it boils)
  • Add in mashed Tempeh, and cook for further 3 minutes
  • Add in all seasoning ingredients, taste - adjust as you like : )
  • Turn off heat
* I don't mind using my bare hand as it will ended up in my own stomach, haha...

Arrange Zucchini Pasta on a clean plate and pour enough of Bolognese Sauce - as desired...

Sprinkle with grated Parmesan Cheese... a little bit won't break the scale!! : ) 

Finally, grab your fork and enjoy this vegetarian, gluten-free and guilt-free meal!!! 

Happy Cooking!!!
xoxo